Translate

Wednesday, May 21, 2014

Spicy Zucchini Pickles by Kimberley Hasselbrink

I haven't had any time for show off the progress of our garden nor have I made any yummies in our kitchen to blog about however I found this recipe today and thought, yea!

Etsy.com handmade and vintage goods
photos by kimberley hasselbrink

She writes, "These pickles are a great answer to the annual zucchini conundrum. Infused with dill, a handful of spices and chile flakes in a vinegary brine, they’re not unlike a classic dill pickle in their savory crunch and ability to pucker a face. The heat from the chile is palpable but not overwhelming; those with a taste for face-numbing heat might want to add more chile flakes. Because these are quick pickles (also called refrigerator pickles), they should be stored in the fridge. However, they’ll keep for a long time in there — a couple months, at least. You can also use this brine with any vegetable you’d like. Happy pickling!"
Spicy Zucchini Pickles
1 pound zucchini (or any summer squash)
2 cups white vinegar
1 cup water
4 garlic cloves, lightly smashed
2 tablespoons sea salt
1 tablespoon dill seeds
2 teaspoons red pepper flakes
1 teaspoon black peppercorns
1 teaspoon coriander seeds
1 teaspoon mustard seeds


"Trim the ends off zucchini and slice lengthwise into quarters.
Bring vinegar, water, salt and spices to a boil. Simmer for five minutes, then remove from heat.
Thoroughly sanitize and rinse the jar you’ll use and keep it filled with hot water until you’re ready to use it.
Pack the zucchini snugly in the jar. Tuck the garlic cloves in. Pour the hot brine over the squash. Let the jar sit, uncovered, until it has cooled, about an hour. Cover and refrigerate. They should keep for a couple of months, if not longer."
Here's the link to this very interesting recipe I might just try this summer. Enjoy! 


Saturday, May 3, 2014

2014 Garden

Finally here the time has come. Just a few months ago from seedlings into the ground they go just a wee plant to nourish our bodies, minds, and soul. 

Wednesday, September 25, 2013

I've got a Garden...

With the move I now have a backyard for my dog Freyja to play in but I also have a garden. 
Here's a photo of the work we did yesterday to get our fall greens going. Off in the back is a gate to a bigger garden, but that's not quite ready yet. If you are like me than you know how growing brings out a whole other level of love, compassion, and appreciation. We are truly blessed, and I am very excited to share as we continue growing within. 


Monday, April 1, 2013

Garden bed prep for spring 2013

I Pulled baby carrots from our raised garden beds today. They were planted last year just before the Frost. We are redoing the garden bed getting it ready for this year's harvest. Everything but the new strawberries must go. Tonight we'll be eating a salad. Take that Monsanto! #Grow your own food #sow true seed


Monday, January 14, 2013

Eastern Garden Vegetable Soup


A hearty blend of garden vegetables simmered in stock seasoned with garlic and a unique spice blend. (Medium Spicy - Spicy)
This soup has a surprising flavor when you think of a traditional vegetable soup. It's delicious!   


Ingredients: 


onion
garlic
celery
carrots
potatoes, 
asparagus, 
parsnips, 
yellow squash
red bell pepper
pealed stewed tomato 
brussels sprouts (whole)
cabbage (shredded)
baby spinach

butter

olive oil
tomato paste

stock 
flour
red wine vinegar
sea salt
pepper
garlic powder
ginger powder
curry powder
turmeric powder


Kombucha - How to Make it


What Is Kombucha Tea?
Kombucha starts out as a sugary tea, which is then fermented with the help of a scoby. “SCOBY” is actually an acronym for “symbiotic culture of bacteria and yeast.” It’s very close cousins to the mother used to make vinegar.
The scoby bacteria and yeast eat most of the sugar in the tea, transforming the tea into a refreshingly fizzy, slightly sour fermented (but mostly non-alcoholic) beverage that is relatively low in calories and sugar.
The SCOBY
Let’s talk about that scoby. It’s weird, right?! It floats, it’s rubbery and slightly spongy, brown stringy bits hang from it, and it transforms sugary tea into something fizzy and sour. It’s totally weird. But if you take a step back, it’s also pretty awesome.
There are a lot of theories about why the bacteria and yeast form this jelly-like layer of cellulose at the top of the kombucha. The most plausible that I’ve found is that it protects the fermenting tea from the air and helps maintain a very specific environment inside the jar that is shielded from outsiders, aka unfriendly bacteria.


http://fitlife.tv/how-to-make-kombucha/

Saturday, January 5, 2013

Forks Over Knives 2011 - Movie


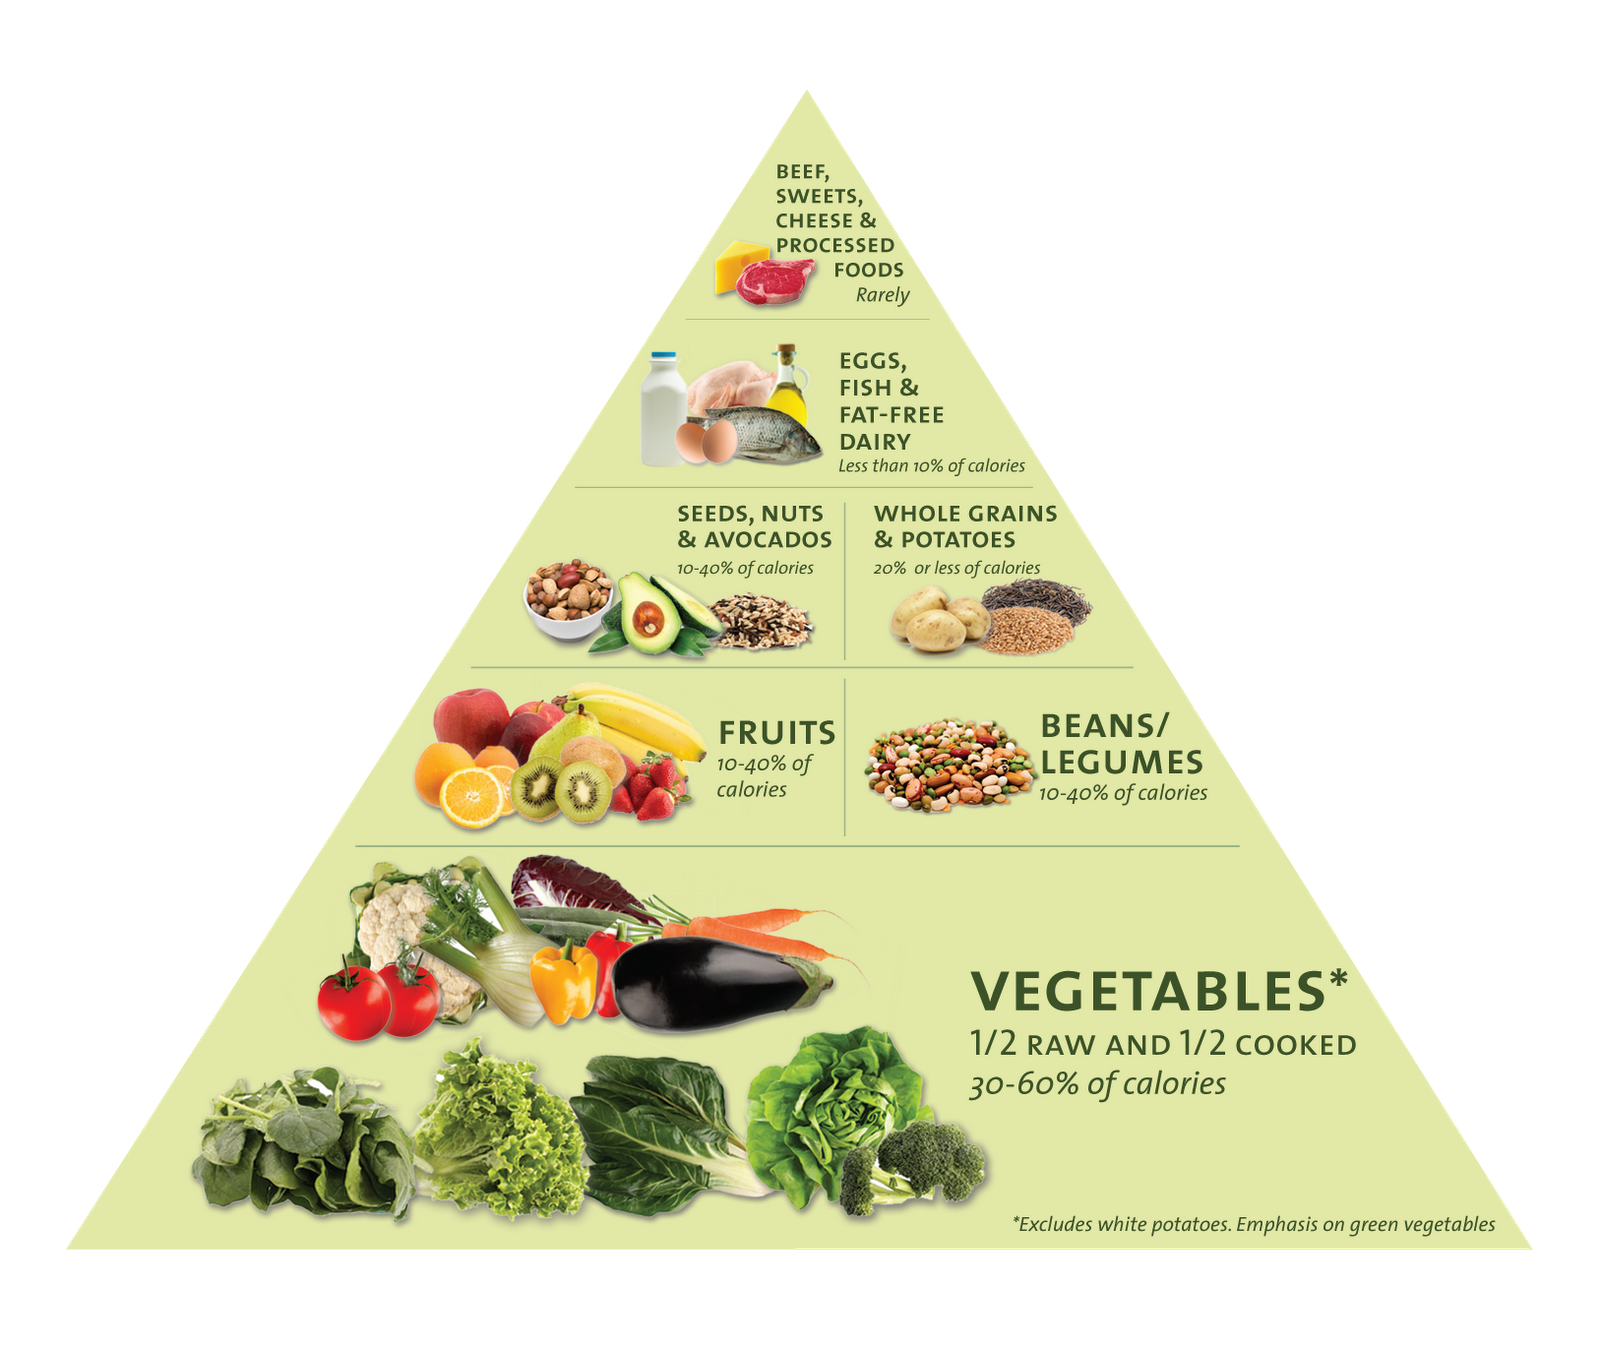
I personally just got around to watching the movie and felt as though I needed to share this information with a few people in my family that also suffer from dis-ease. I highly recommend watching/buying/sharing the movie and hopefully make some wonderful changes to your diet so that you are around the people that love you the most a lot longer.  xoxo love Tania  


The idea of food as medicine is put to the test. Throughout the film, cameras follow “reality patients” who have chronic conditions from heart disease to diabetes. Doctors teach these patients how to adopt a whole-foods plant-based diet as the primary approach to treat their ailments—while the challenges and triumphs of their journeys are revealed.
FORKS OVER KNIVES examines the profound claim that most, if not all, of the degenerative diseases that afflict us can be controlled, or even reversed, by rejecting our present menu of animal-based and processed foods. The major storyline in the film traces the personal journeys of a pair of pioneering yet under-appreciated researchers, Dr. T. Colin Campbell and Dr. Caldwell Esselstyn.


Friday, January 4, 2013

Growing Within - Winter Months and DIY Hydrofarm

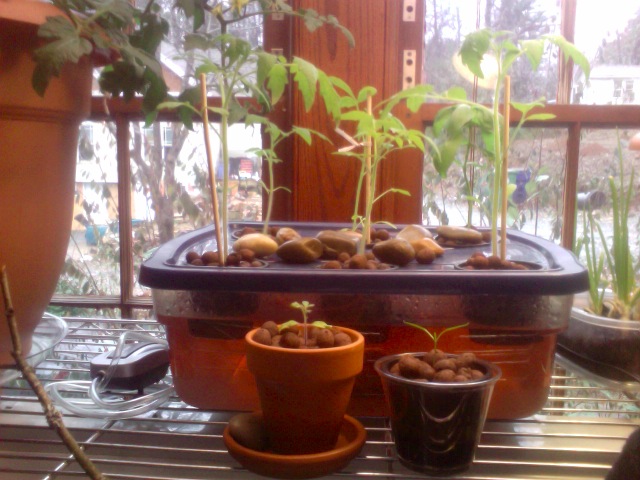
diy hydrofarm


set up in the dining area in front of the window. 
the shelves are holding the hydroponic DIY container, the blooming tomato and pepper plants,  some house plants, and the budding lemon tree :) 
This will be home until spring. 

UPDATE PHOTO January 14th 2013. 
See how fast we are growing! 

The peppers and tomato plants are growing so fast. See the difference between the two smaller plants in the front of the photo not in the hydroponic system and the ones that are in the system. I started them from seeds all the same day. Things grow much faster in the system. Very excited. 

UPDATE PHOTO January 26th 2013. 

Now, two are 19" tall ready to switch into individual grow buckets on Monday.
(I'll have a post on that next week.)  


Thursday, January 3, 2013

My Vegetarian Lentil Soup

My Vegetarian Lentil Soup
by Tania Calderón

click on photos to enlarge


Happy New Year!!!! This 2013 will be a very exciting year in the world of food and growing within. Some of you may know I started sprouting a few months back and We've also started a small hydroponic system which will hopefully grow our tomatoes and peppers indoors.

I'm very excited about the new year and all of the new magic it will bring into our lives, and belly. So, today I'm starting off this blog with a simple Lentil Soup recipe.
There are several types of Lentil Soups, they are a great source of fiber, protein, and iron. During the winter I really enjoy hot soup like many others and especially love the smell of my home when food is simmering on the oven for a few hours slow cooking that nights dinner.
This is one I threw together late this morning to cook in my new crock pot.
Since I've only used the crock pot once it's an experiment because I'm using dry beans that I didn't soak the night before hand.


(uncooked) 


INGREDIENTS
  • 2 tablespoon olive oil
  • 1 medium celery stalk, sliced
  • 1 medium carrot, peeled and small dice
  • 1/2 medium yellow onion, small dice
  • 3 large garlic cloves, minced
  • Kosher salt (to taste) 
  • Freshly ground black pepper (to taste) 
  • 1 quart vegetable broth
  • 14-ounce caned San Marzano whole peeled tomatoes in SM puree 
  • 1 1/4 cups dry beans (I used 3/4 cup brown lentils, 1/4 cup chick peas, split peas) 
  • 1 bay leaf
  •  chopped fresh thyme leaves and stems (to taste) 
  • 1 teaspoon red wine vinegar 
  • 5 medium large brussels sprouts, trimmed and cut in two. 


So let's get started...  
I have an assortment of dry beans that I used although I call this lentil soup because I used more of them than the others. 
I boiled the dry beans about 5 minutes on the stove before adding them to the crock pot.
Then I added my other ingredients in the order listed above. 

(uncooked) 

I'll let that simmer for a few hours and by the time I'm ready for dinner my delicious vegetarian lentil soup will be done. No fuss, and what I like about this recipe is all of the ingredients are simple and in their natural form (unprocessed). 


Here we are 5 - 6 hrs later. 
Bon Appetít! 


(btw Basic Lentil Soup Recipe here By 

Friday, December 14, 2012

Tuesday, December 11, 2012

Juicing OJ & Sprouts

JUICING ORANGES


After watching a video on youtube about the flavor packs put into 100% natural OJ I decided to try and make our own as often as possible. Since we both have family in the sunshine state how blessed are we. 
Here's a typical amount needed to fill a full carafe. We have blood oranges and tangerines. I prefer mine at room temp because you can taste more of the flavor than when it's been in the fridge for some time. I love the colors in this photo I took in the kitchen. Window lighting is my best friend and I suggest all new photographers experiment using it to meet their goals. 


SPROUTS

Easiest way to have healthy greens all year long. 
I'm a big fan and have been sprouting non-stop for the past two months with all kinds a seeds.
I use the jarring method and usually have 1 - 3 sitting on the counter top at a time. 
We put them on salads and sandwiches. Healthy... yummy... Grow your Food!!!  
  

Two tablespoons of a mixed salad blend and they are bulging out ready for eating at any stage you prefer. On this day I made salads for lunch so here they are hulls and all, and I just pinched a bit off the top, and used the salad spinner. Fast no hassle, you could actually eat the hulls with no problem. 


adding and .....

Voilà,  Bon Appetít!


Oh... here's some lentils too. 
different day... different meal still fantastic. 


Tuesday, November 13, 2012

Sprouts Baby

I have been harvesting all sorts of sprouts grown in my kitchen in a few mason jars on the counter. Have a look at these mung beans harvested today.

After 5-6 days look how long they've grown

washing / de-hulling

into the compost the hulls go

Drying- Salad Spinner on the way. 

Here are the dry beans with the freshly washed mung beans as they dry.

In the salad for lunch along with a generous dollop of homemade red pepper hummus 


You would be surprised if you didn't know anything about sprouting how easy it is to get the micronutrient rich energy from sprouting in your own kitchen. 
Most of the info I've learned I read on sproutpeople.org They are wonderful and offer plenty of useful info and videos to get you started. 
I've eaten sprouts but I never thought about growing my own until a few weeks ago. 
It's an easy way to have fresh greens all year and since our raised bed wasn't successful this seemed like the next BEST thing. 
This is something I'll commit to for life so if the mason jar method one day wears on me I'd like to buy this. EasyGreen Sprouter 


Happy Sprouting!

Monday, November 12, 2012

Thursday, August 9, 2012

Detox, 10 day Juice Reboot & Cleanse - Day 1 & 2

So let's do this, Quick Start Reboot -10 days eating and drinking only fruits and vegetables, mostly raw but some cooked.. I'm on the Reboot Baby! A full blast of micronutrients more than any human can consume in one day by just eating alone. Also, I've added daily cleanses to the routine which I've been doing at night. If you don't know what I mean by "cleanse" click here. 
*Side Note: How did I give up coffee, or better how did I give up coffee flavored creamer? Well once you give up that sugary flavored treat coffee just isn't the same. Black coffee is bitter so if you drink it, it's for the coffee not the disguise of dessert for breakfast. 
How hard could this be? I've been juicing for years so here I go. Keeping a journal is a clear way to notice your progress. This will be something to look back at later. 

Day 1 
Breakfast: Black coffee, and water? Ooopsss, hadn't been to the store. Full on hunger headache.  

Lunch: 1/2 cup Thai Sweet Potato Soup Which I had just bought and enjoyed, although that's not really on the "plan" other soups are. I decided I'm not going to be too strict and use this time and experience more as a guide. By the way I found this great vegan recipe for this soup here.  Ingredients: Sweet potatoes, Winter squash, Carrots, Onions, Creamed coconut, Almond butter, Rice flour, Corn starch, Sea salt, Apple cider vinegar, Garlic, Lemon grass, Onion powder, Garlic powder, Chili pepper, Ginger, Lime oil


Afternoon Snack: Skipped :( Still getting used to the routine. 

Dinner: By dinner I'm still feeling a headache and frequenting the little girls room often due to the increase of water I'm drinking between juicing. Ah, but at last dinner is here and I'm having a huge mixed green salad with shiitake dressing and a side of backed thyme and garlic baby potatoes. After dinner my body is thanking me and I'm slightly feeling normal.   

Late Night: After my cleanse and before bed, I still am holding on to this headache while drinking my herbal tea with lemon, but I'm more anxious about falling asleep. 
I'm not able to and toss all night with hot and cold sweats. I'm convinced this detox is in full effect and wait till morning. 

Day 2

Early Morning: Not fun :( Hot water with lemon, then after a full 16 oz glass of water. Day 2 was the worst. I wasn't myself due to lack of sleep and I was really nauseous. On the bright side Lance jumped on board and how cool is that. My best friend giving me exactly what one could ask for in this situation, a friend to go with. 

Breakfast: Carrot, Apple, and Ginger juice. 

Mid Morning: Beet, Cucumber, Kale, Celery, Apples, Lemon, Ginger juice.

Lunch: Gazpacho Juice (in the juicer) Tomates, Cucumber, Celery, Bell Pepper, Onion, Persley, Lime, and I added 100% pure Tomato juice for more of a gazpacho flavor. 
After lunch I'd felt my worst so far. I needed to lie down, my head hurt so bad. I wasn't hungry I just ached from the process. 

Afternoon Snack: Beet, Cucumber, Kale, Celery, Apples, Lemon, Ginger juice and a handful of peanuts/soy nuts mix. non-gmo.

Dinner: Large green salad, and 1/2 cup of the leftover thai sweet potato soup. 

Late Night: Ahhh... the cleanse was rough. removing the toxins from the body that have been stored up day after day. It was a quite intense process without getting to detailed. 
I had a large pot of herbal tea, that helps with sleep, and calming the body before bed.  
The process, for me has me thinking of the way we I think about food and our addictions. 
I'm happy to turn out the lights. 

*I don't advise you try this without consulting a professional. This can have many side effects on your body. Before juicing for days on end I suggest looking into a whole foods lifestyle and talking with a professional.  
  
For more information I suggest you watch this free movie, and visit the REBOOT website

Good Luck to a happier, healthier you.   


Sunday, July 15, 2012

Tomatoes, Raw Recipes, Enemas

Hello Blog Readers, 
I know it's been some time and do feel a bit guilty for not having shared some updates from the new garden, which by the way isn't growing anywhere near as well as when we had the greenroom in the loft, oh well. I'm still enjoying the the house and the work that we put into creating the space to grow food, as well as our passion for healthy food choices and lifestyle. 
It's already June and tomatoes are abundant everywhere. Even here thanks to special friends Courtney & Landon who shared their beautiful heirloom tomatoes with us. I took this photo earlier today just before slicing into it. It is so delicious, I'll have to make the drive to Pine Mountain from Atlanta for more. 


On another note I've been reading some food blogs and landed on one in particular that I'm really impressed with by Angela & Matt Monarch from "The Raw Food World" who both live a100% Raw Vegan life and have so for years. They are a very sweet couple, and I've enjoyed watching their You Tube Videos learning more about raw food, detoxifying and their life in beautiful country somewhere in Ecuador I think, still not sure but it is beautiful.   

Angela has a nice treat which is an e-book cookbook of raw recipes which I downloaded today and immediately found things that looked good to me, so I thought I'd share. You can find her e-book by clicking on the link below.                                                                The Profoundly Raw Recipes eBook                 This FREE ebook contains a collection of over 35 fabulous raw recipes, contributed by 12 well-known raw food chefs.


While amusing myself watching their videos I found one on Detoxing/Enemas that I really liked. 
For example, in the past I've gone to the health food store and purchased a 2 week or whatever detox cleansing kit that did nothing. Have you? Since watching a few videos and doing my own research,  I've purchased a water bottle kit so I can perform routine enemas at home. It is simple enough and the health benefits outweighed any hesitation I had. Today is day #2 and I'm feeling good. I'm using purified water only. No organic coffee for me. I might try chamomile tea in the future but for now just water. 

If you plan on doing this at home I suggest talking with a professional which I am not :) 
I watched this video below which helped me understand the water bottle.  

I think that's all for now. I've been super busy but I hope to make it back here again soon and share a little more on Growing Within. 


Tuesday, July 3, 2012

Soul Insights 4 Soul Led Living: The "Shift" Smoothie- Good for your Body & Mind

You know how much I enjoy my green juice and juicing in general. Well, through a series of personal steps the universe and I connected with Michele Meiche who's recipe this is. Thanks Michele, Enjoy!  

Soul Insights 4 Soul Led Living: The "Shift" Smoothie- Good for your Body & Mind


The "Shift" Smoothie- Good for your Body & Mind

I am so loving this smoothie for the "Shift" ....

This smoothie is filled with nourishing delights... chock full of Blueberries and rich with Chlorella, Spirulina and a protein powder that feeds body & mind.

It is really important during this time of Ascension and Shifting that we consistently eat foods that nourish and  feed the brain, nervous system and bolster our immune system.

I am listing here the general ingredients for this smoothie.  I suggest that you individualize for yourself... keep out what you don't like & add what you do :)

Blueberry Shift Smoothie:
Start with a base of alkaline water and a couple of splashes of juice, such as orange juice 
1-2 scoops of high quality protein powder
1-2 tablespoons of Spirulina
1 -2 tablespoons of  Chlorella 
3-5 drops of Cell Food
3-4 drops of Liquid Minerals
Dash of Cinnamon
1 Banana
1 tablespoon of  Cod Liver/Omega 3 Oil and/or Coconut Oil
 1 - 2  Tablespoons of Blueberries

Tuesday, June 12, 2012

Beet Chips


Ingredients

  • 2 medium beets
  • 1 teaspoon extra-virgin olive oil

Directions

  1. Preheat oven to 350 degrees, with racks in upper and lower thirds. Peel beets and slice 1/16 inch thick with a mandoline. In a large bowl, toss beets with extra-virgin olive oil.
  2. On two rimmed baking sheets (or use one sheet and bake in two batches), arrange beets in a single layer. Stack another rimmed baking sheet on top of each. Bake until edges of beets begin to dry out, about 20 minutes. Uncover and rotate sheets. Bake 10 to 20 minutes, removing chips as they become lightened in color. Transfer to a wire rack; chips will crisp up as they cool.


Re-Growing Food From Scraps


KALE STEM

I had to add kale to this list below of an article I found today. We've been doing this experiment with the stem of the kale I posted a few weeks ago. 
After using the long leaves I place the 8" long stem into a mason jar with some water out on the porch. When it began growing leaves I pulled those and ate them and planted the stem into a bed that gets about 2hrs of sun/day. Today I went down and took this photo. 

The article below reveals 4 other examples for you to try but I'm sure there are more. Enjoy!

4 Foods That'll Re-Grow from Kitchen Scraps
Written by Lacy Boggs Renner   

You recycle your bottles and newspapers, you upcycle thrift store finds into decor treasures, and you reuse all your plastic bags. But do you upcycle your food scraps?  We're not talking compost here, we're talking re-growing food from scraps you might have tossed.
Turns out, several odds and ends you might have tossed can be re-grown into more food!

Scallions

When your recipe only calls for the green part of the scallions, don't toss the white end with the roots. Stick it in aglass jar with a little water and the greens will grow back. You can just snip off what you need as you go. This also works with leeks.

Lemongrass

This delicious, aromatic herb is really just a grass and will grow well in a pot in a sunny spot. Take the root ends (after you've used the rest in a recipe) and put in a jar of water in a sunny spot. After a week or so, you'll start to see roots appearing. Once the roots look healthy, transplant your lemongrass to a pot and let it grow. You can start harvesting when the stalks get to be a foot or more tall.

Celery

The next time you're chopping a bunch of celery, save the root end! Place it in a shallow bowl of water, and after a few days, you should start to see roots and new leaves appear. As soon as you see these, you can plant the celery—leaving the leaves just above the soil.  The plant will continue to grow, and soon you'll have a whole new head of celery!

Ginger

Did you know that ginger makes a beautiful (and useful) houseplant? If you've got a piece of fresh ginger going spare in your fridge, you can plant it in potting soil. Ginger is a root, and before long, you'll notice a lovely plant sprouting from it. Once the plant is big enough, you can actually pull it up, whack off a piece of the root, and replant it whenever you need fresh ginger—or just enjoy your culinary houseplant.